The creep rupture test (stress rupture test) is used to measure the strength of materials that are subjected to constant stress at elevated temperatures.
Creep
If components are subjected to a constant tensile load under normal conditions below the yield point, this usually results in a constant (elastic) elongation over time. Above the yield point, plastic deformations occur, which, however, can come to an halt due to strain hardening effects. Under normal conditions, no further expansion of the component will occur in this case either. Despite plastic deformation, the component does not fracture. However, these behaviours only apply on condition that the component is not exposed to excessively high temperatures. Materials often behave differently at elevated temperatures!
At elevated temperatures, the material is usually “softened” and both the yield strength and tensile strength decrease. Up to certain temperatures, this can be demonstrated in the tensile test with heated samples. The yield strengths obtained at elevated temperatures are then referred to as hot yield strengths.
Elastic stress limits above which plastic deformations occur at elevated temperatures are referred to as hot yield strengths!
However, the hot yield strengths can only be used as a basis for dimensioning of components if the creep described below cannot occur or can at least be neglected.
For example, high temperatures can cause materials to lose their elastic limit under prolonged stress. The material lengthens irreversibly over a longer period of time, no matter how low the tension will be. This plastic deformation over a longer period of time at elevated temperature and under static stress is also referred to as creeping.
Creep is the irreversible deformation of a material at elevated temperatures, even at the lowest stresses!
The cause of creep is explained in more detail in the section Creep mechanism. Creep always increases with the following influencing variables:
- load intensity,
- load duration
- temperature
In tensile tests, creeping cannot really be measured, since the specimen is deformed relatively quickly under rapidly increasing stress to fracture. The time-controlled creeping is then not relevant. This also applies to the hot yield strengths determined in heated tensile tests!
For this reason, special tests have to be carried out which are run at elevated temperature for a relatively long period of time under constant tensile stress, so that creeping can be detected and measured. These so-called creep rupture tests or stress rupture tests can cover a period of several years (!) in long-term tests. The creep rupture test is of great importance, for example, for materials for turbine blades or for screws of pressure vessels.
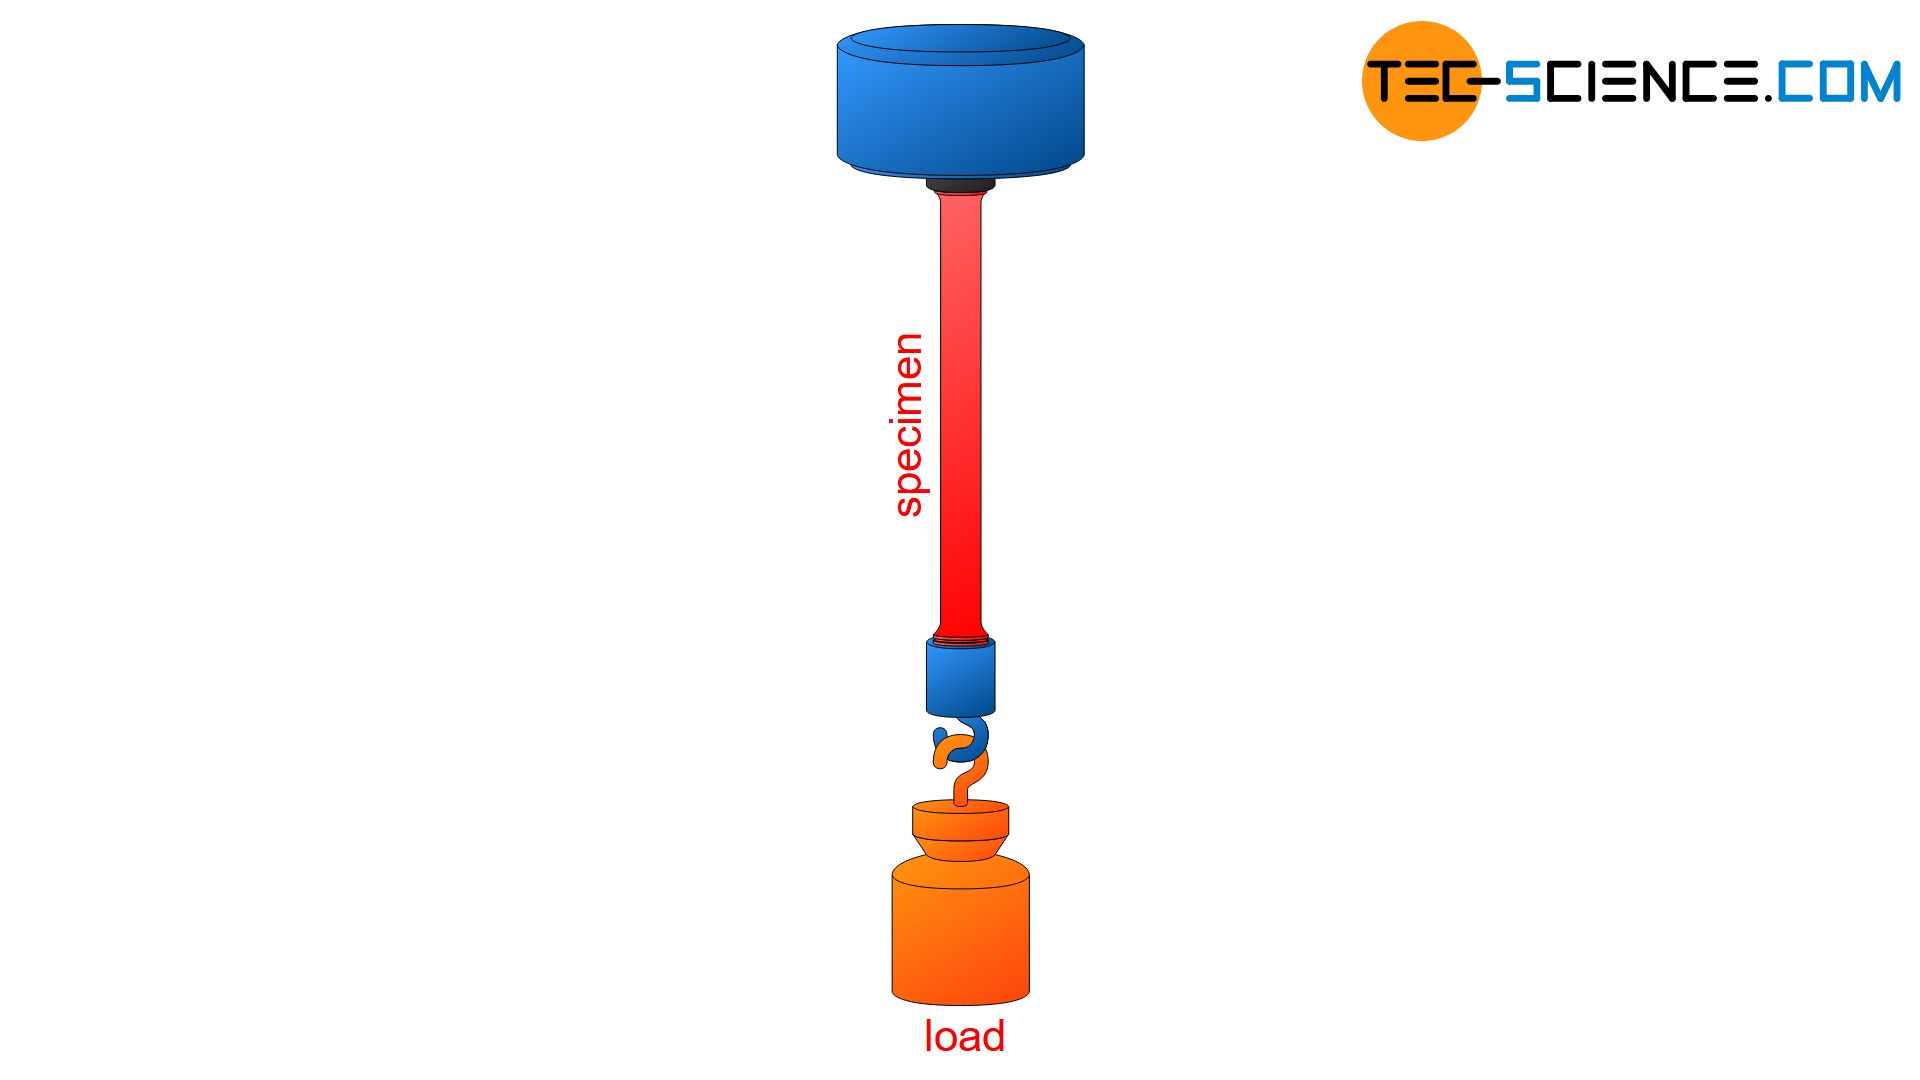
The creep rupture test (stress rupture test) is used to measure the high-temperature strength of materials that are subjected to constant stress at elevated temperatures over a longer period of time.
Note that the phenomenon of creep also occurs at relatively low temperatures. However, the processes required for such a creeping are usually so slow that creeping at room temperature has no practical importance for metallic materials. Only in the range from approx. 40 % of the melting temperature (in Kelvin) is a technically relevant creeping to be expected. For structural steels, this means temperatures above approx. 400 °C.
Creep curve
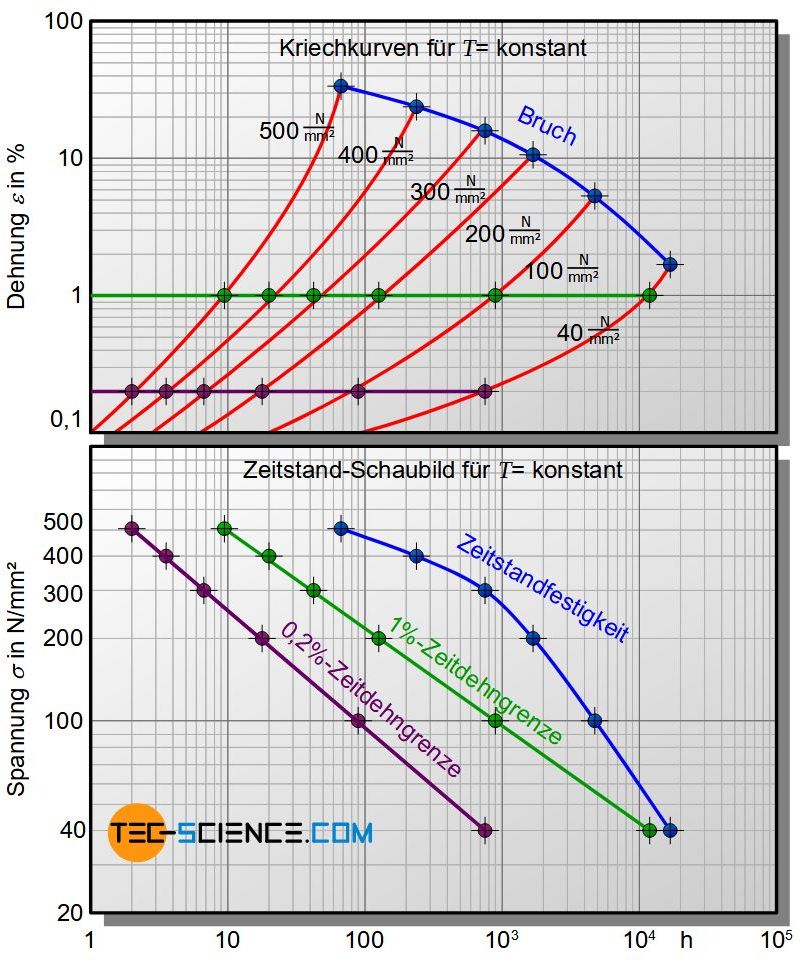
In the stress rupture test, the time \(t\) at constant temperature is determined, which leads at a given stress \(\sigma\) to a certain plastic strain \(\epsilon\) or to fracture of the specimen. If the plastic deformation of the sample is additionally measured at regular intervals (creep strain), this test variant is then referred to as creep rupture test. This procedure is repeated on several identical specimens with different stresses, whereby the test temperature remains unchanged in all cases. The obtained temporal course of the creep strains are also referred to as creep curves.
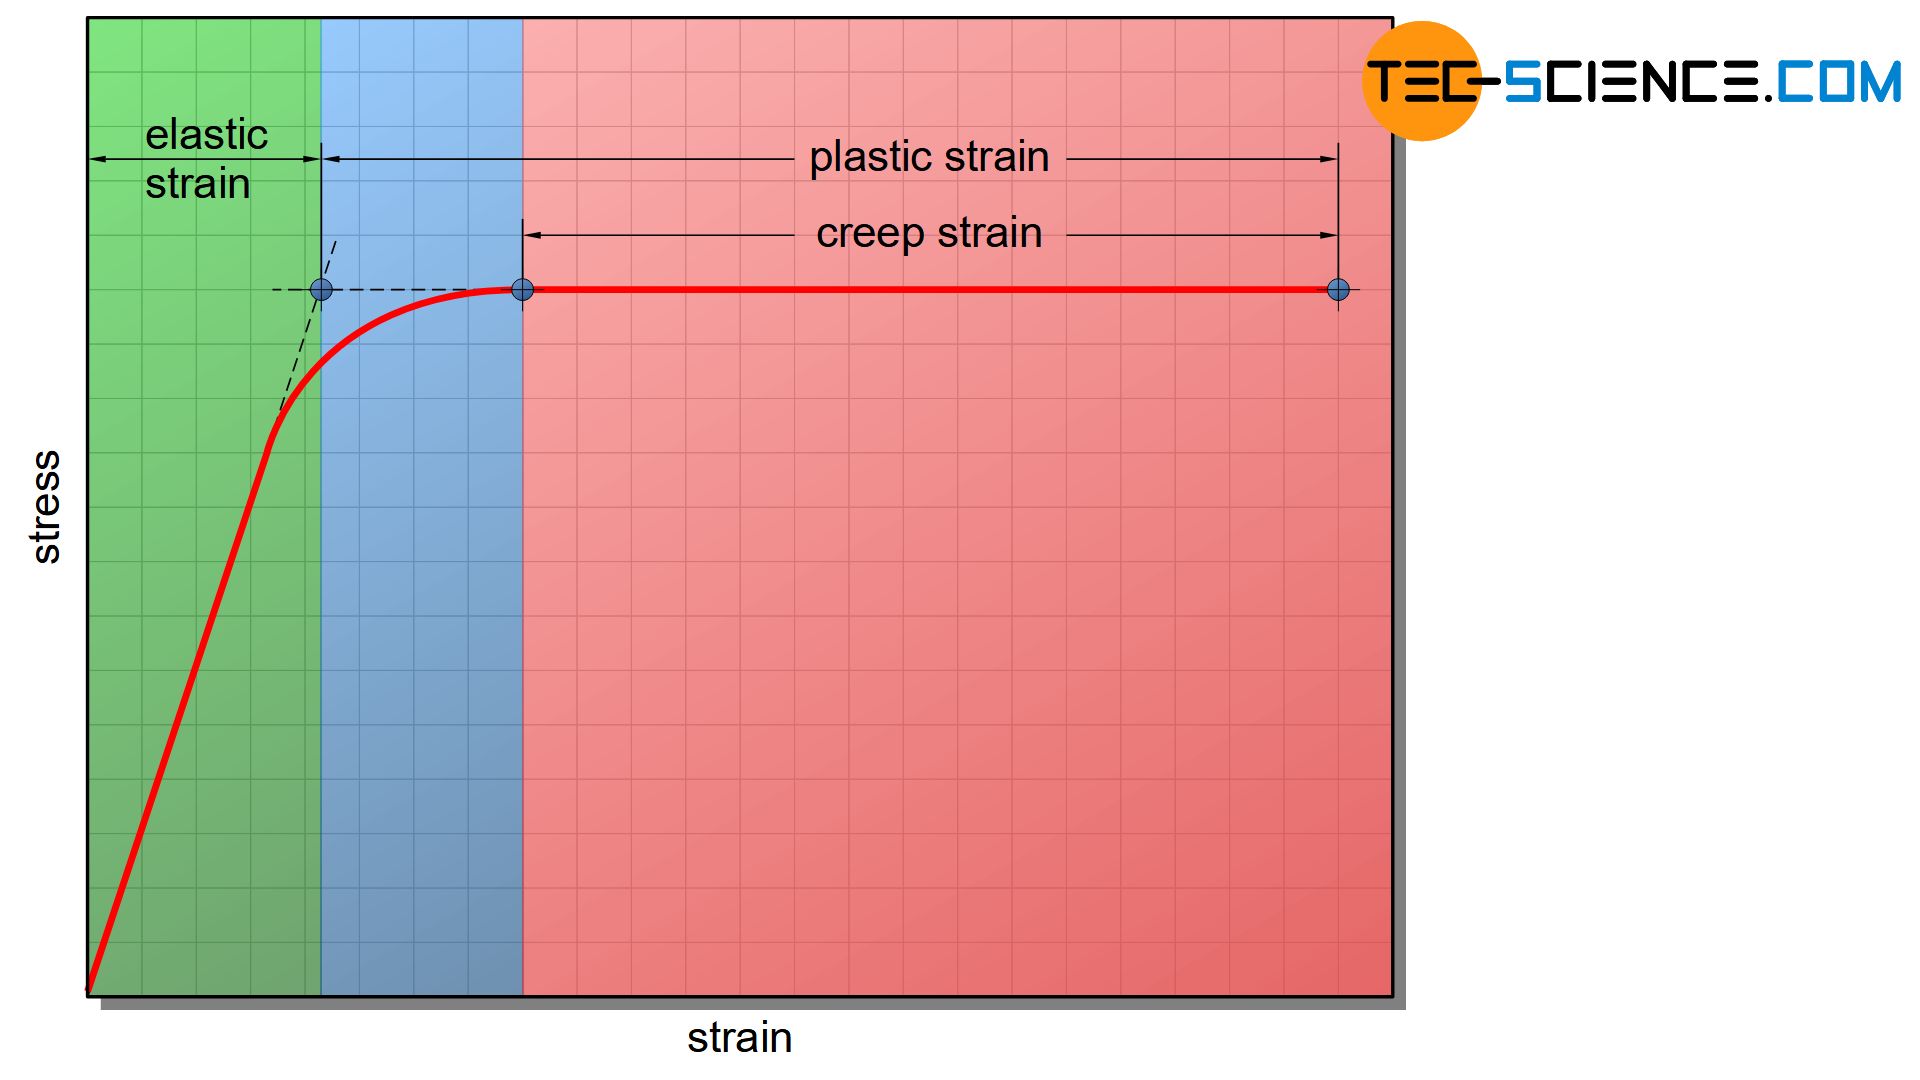
In the stress rupture test, the duration until the specimen breaks is determined at constant stress and temperature. In the creep rupture test, the temporal course of the creep strain is recorded too (creep curves)!
From the creep curves, the time leading to a certain plastic strain or fracture can then be transferred to a separate time-stress diagram. This type of diagram is also referred to as creep diagram. For a given period of use, the stress can be determined from this diagram which leads to a certain creep strain (creep strain limit or creep limit for short) or to fracture of the specimen (creep strength). Note that creep diagrams only ever apply to a certain temperature!
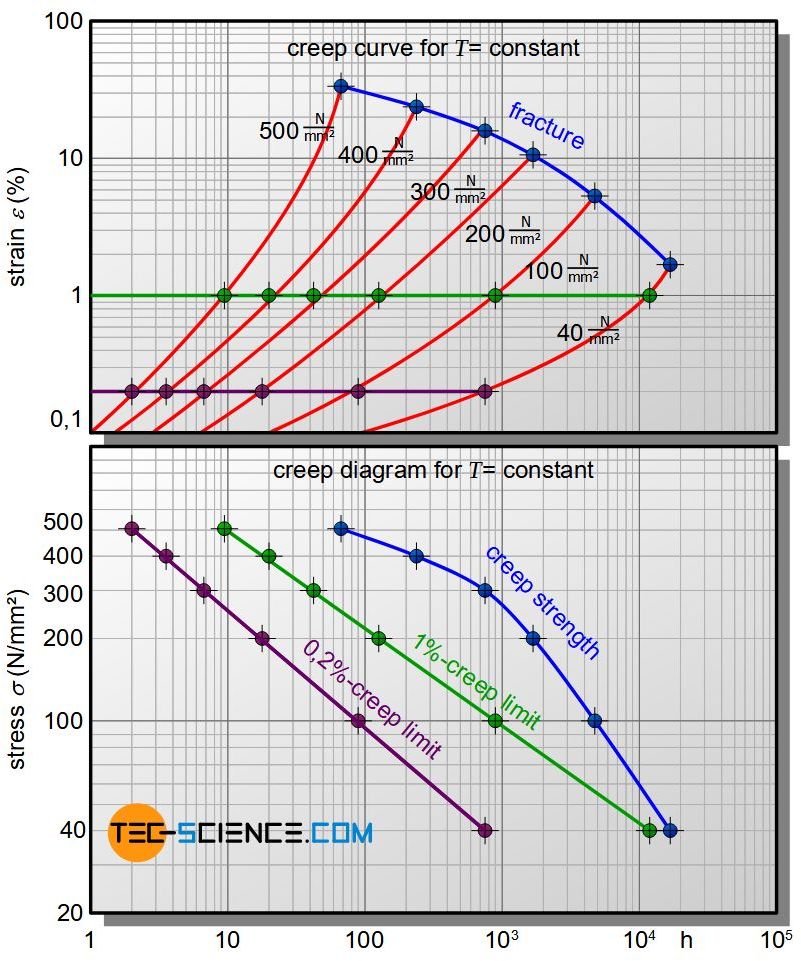
A creep limit in the specification \(R_{p1/10,000h/400°C}\) = 170 N/mm² means that the material lengthens plastically by 1 % at a temperature of 400 °C when subjected to a stress of 170 N/mm² for 10,000 hours. The specification of a creep strength of \(R_{m/10,000h/500°C}\) = 74 N/mm² means that the material can withstand a stress of 74 N/mm² at a temperature of 500 °C for a total of 10,000 hours before it fractures.
Note that with creep rupture tests there are no permanent strengths as with fatigue tests, i.e. the specimen will sooner or later always suffer plastic deformation or breakage, no matter how low the stresses.
Creep mechanism
The reasons for creep are thermally activated processes. Thus, diffusion processes take effect at high temperatures. Due to the increasing change of location of the atoms, pinned dislocations on obstacles can be released by climbing or cross-slipping and move on to other slip planes (dislocation gliding). This results in irreversible deformation processes even at low stresses.
In addition, above the recrystallisation temperature, the grain boundaries change due to the diffusing atoms. The grain boundaries begin to move and the grains shift. This grain boundary sliding also contributes to the gradual deformation of the microstructure under load. Grain boundary sliding is particularly pronounced in microstructures with many grain boundaries, i.e. fine-grained microstructures. By means of a coarse-grained structure, however, grain boundary sliding can be reduced.
All the processes mentioned above, such as dislocation gliding and grain boundary sliding, are diffusion-controlled and therefore always take up a certain amount of time. For this reason, the irreversible deformation process (creep) only becomes noticeable over a longer period of time.
In principle, creep can come to a halt due to work hardening, provided the temperature is below the recrystallisation temperature. In such cases, fine-grained microstructures show better strength values than coarse-grained microstructures due to grain boundary hardening. Above the recrystallisation temperature, however, strain-hardening effects are absent due to the steadily formation of new grains, so that a permanent creep to fracture can be observed. Due to the better resistance to grain boundary sliding, coarse-grained microstructures show better strength values than fine-grained materials. For this reason, grain boundary-free materials are used for thermally and mechanically highly stressed turbine blades (single-crystalline nickel-based superalloys).
Coarse-grained or even grain boundary-free materials (single crystals) are particularly suitable for high-temperature applications!
Creep stages
Creep curves provide important information about the temporal dynamics of creep, i.e. how creep progresses over time. Depending on whether the creep test is carried out below or above the recrystallisation temperature, the creep process can be stopped by strain hardening (curve 1) or it will inevitably lead to fracture (curves 2 and 3). In general, three stages can be distinguished in the creep curves.
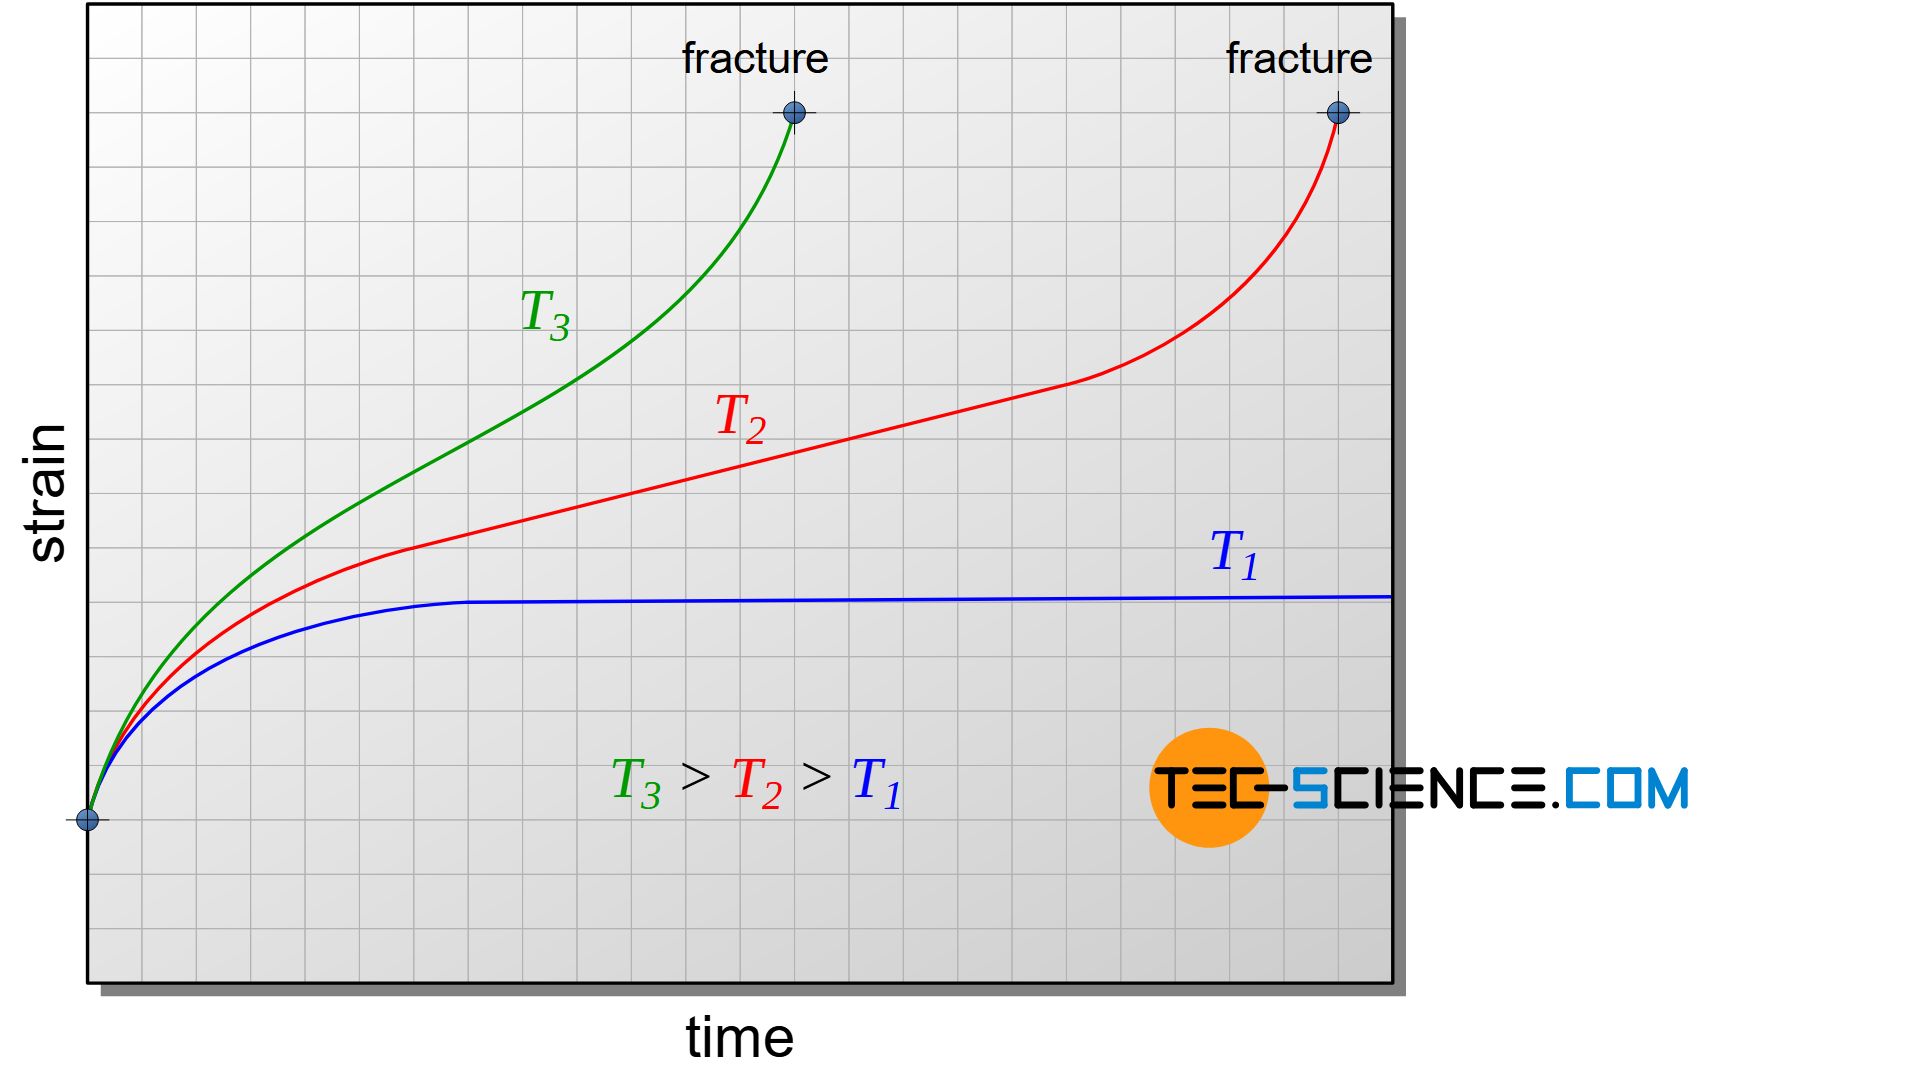
Stage I is called primary creep or transition creep and is characterized by a gradual decrease in creep speed. The slowing down of the creep speed is caused by hardening effects due to the accumulation of dislocations. Especially at relatively low temperatures, this stage I is very pronounced.
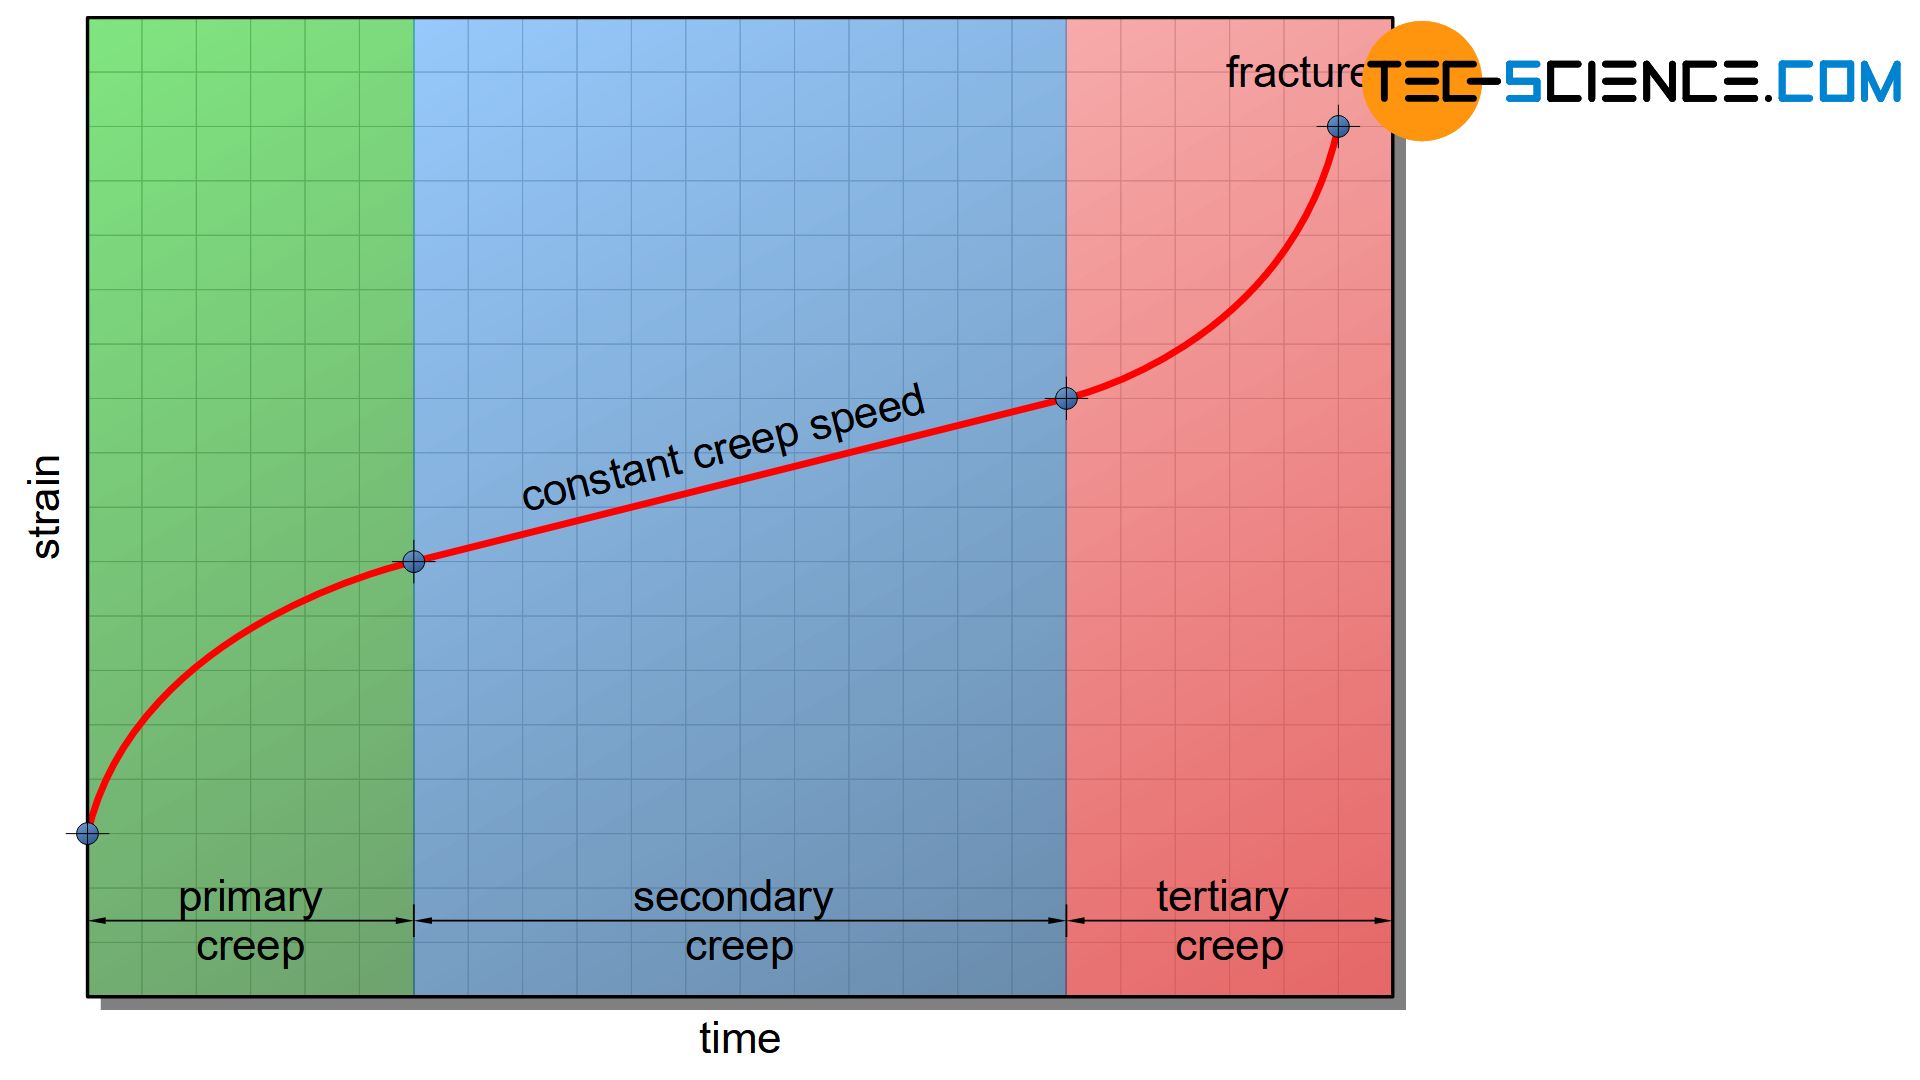
Finally, as elongation or time progresses, a dynamic equilibrium between the hardening effects through dislocation accumulation and the softening effects through dislocation gliding will develop. This stage II is also referred to as secondary creep or stationary creep and is therefore characterized by a constant creep speed. This stage accounts for a large proportion of the total service life of the sample at elevated temperatures and therefore plays a very important role.
With increasing elongation, pores form in the material over time and creep resistance decreases. This results in an accelerated creep strain which causes cracks in the material. This stage III is also known as tertiary creep and is characterized by a significant increase in creep speed which finally ends in the fracture of the sample. Tertiary creep usually covers only a relatively short time measured in relation to the total service life of the sample.

